
Sump pumps are a great way to protect your home from severe water damage in heavy rainstorms. However, your pump and its components are subject to wear and tear and require routine maintenance.
Start by checking outside the basin to ensure the pump discharge pipe isn’t obstructed with dirt or grass. It should also be drained and free of residual water that could freeze in the winter, burst, or block proper flow. Contact Woodlands Plumbing for professional help.
A faulty sump pump can cause water damage in your basement and other areas of your home. That’s why it’s important to check your sump pump regularly. You should also check it after heavy rains or snow. If you notice any issues, it’s a good idea to schedule a professional inspection.
When your sump pump starts and stops frequently, it’s a sign that it isn’t functioning properly. It could be due to a problem with the float switch or the discharge pipe. You can check the float switch by pouring five gallons of water into the basin and observing the action. Make sure the float switch moves through its entire range without binding and that it turns on and off when it should.
It’s also a good idea to inspect the discharge pipe for any obstructions. Your discharge pipe should be able to handle the amount of water your sump pump pumps out at once. If it isn’t, you may need to reroute the discharge pipe or install a dry well.
The battery backup for your sump pump should be replaced every seven years. If yours is nearing that time, it’s a good idea to get a new one so you can continue to have emergency protection from flooding in your basement.
You can also test the GFCI outlet in your sump pump pit to make sure it shuts off during a power surge. You should also use a flashlight to look inside the sump pit and make sure it’s clear of debris. Finally, you should clean the grate, drainage pipes, and pump inlet screen. Once you’re finished, you should remove the pump from the pit for a visual inspection and cleaning.
Check the Discharge Pipe
A sump pump carries water away from the area in which it sits, and it’s important to check that the discharge pipe is unobstructed and not clogged. If the pipe is clogged, your pump may overheat because it won’t be able to remove enough water from the basin. It’s a good idea to inspect the drainage pipe for blockages and debris on an annual basis.
Start by disconnecting your sump pump from the discharge line that leads outside, and emptying the basin. This will make it easier to clean the pump itself. Then, carefully remove the pump from the basin and clean it thoroughly using a wet vacuum and a rag. This will include the float switch and other parts of the pump that are exposed to the water.
It’s also a good idea to use a CT ammeter (or other non-contact ammeter) to verify that the power drawn by your pump is consistent and not fluctuating. This will help you detect heat spots in your pump that could lead to premature wear and breakdown.
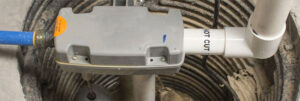
Lastly, take the time to inspect the check valve on your discharge pipe and ensure it is working properly. This one-way valve, located on the discharge pipe just before it connects to your home, helps prevent back-flow of water and protects your sewer system.
You should also check the air release hole, sometimes referred to as a weep hole or an air vent, on your discharge pipe and confirm it is still intact. This hole is drilled in the discharge pipe about 5″ above the pump discharge connection and below the check valve by your installer and allows the escape of air that gets trapped inside the pit.
Finally, if your pump has bearings, read the owner’s manual to see if they need to be lubricated. Some pumps have sealed bearings, which don’t need lubrication, but others do require this maintenance. Once you’re done, reassemble your sump pump, reconnect it to the discharge pipe, and plug it in.
Test the Pump
The pump is the most vital component of a sump system, and you’ll need to test it for proper operation. Pour a few gallons of water into the pit, then watch to see whether or not the pump activates and pumps away the water. If you notice that the pump isn’t working correctly, you may need to replace it.
Sump pumps usually operate on a float system, much like a toilet, that rises with the water level in the pit and triggers the pump to start pulling water out of the pit. This is typically done by a sensor attached to the float switch, although some pumps use an alternative level sensor. To test this, you’ll want to pour enough water into the pit so that the float rises and activates the motor. Once it does, make sure the pump continues to run until the level is below the float switch, then shuts off.
You’ll also want to check the discharge pipe during this time, making sure it drains well and isn’t obstructed. If the discharge pipe is too close to your home, it could back up into your sump, causing nonstop flooding. To prevent this, you can reroute the discharge pipe to a dry well or municipal storm drain.
During your sump pump maintenance, you’ll also want to verify that the power cord and electrical connections are working properly. Many sump pumps come equipped with a built-in surge protector with GFCI (ground fault circuit interrupter), which will protect against electrical shock and cut the power to your pump if there is a short in the wiring. If you’re unsure how to test the GFCI, contact your sump pump installer for instructions.
Finally, you’ll want to ensure that the backup battery has a charge and is working properly. During this time, you can also clean the pump inlet screen and power cord, as well as remove debris from the pit. This will help keep your pump in good working condition, so it’ll be ready to work during heavy rainstorms.
Check for Rust
Regardless of how well you care for your sump pump, it will eventually wear out and require repairs. It’s important to have a regular maintenance schedule to keep your pump in top condition and to ensure that all of its parts are working properly. For instance, you should replace the backup battery every three years and clean it occasionally, readjust weights and floats, and wipe down tiny particles with vinegar to prevent corrosion. You should also check the discharge pipe to make sure that it’s directing water away from your home and that it isn’t blocked or clogged. Finally, you should test the sump pump by pouring a bucket of water into it.
If you hear strange noises coming from your sump pump, it’s time to call a professional. Normally, a sump pump will only emit a low constant hum, but strange sounds indicate that a part is wearing out and could soon fail. This could lead to your basement flooding, which is not something you want to experience.
The most common cause of sump pump failure is a faulty float switch. This may happen if the switch gets stuck or isn’t set at the right level. It can also happen if the check valve is faulty and allows water to flow back into the pit once it has been pumped out. In either case, the best way to fix this problem is to drain the pump basin and remove the cover to inspect the interior for foreign objects such as debris or small rocks that could obstruct the float switch or the check valve.
You should also inspect the discharge line to make sure that it’s directing the water at least 20 feet away from your home and that there aren’t any blockages or cracks in the line. The float switch and inlet screen should be inspected for any damage or wear and cleaned, as well. It’s also a good idea to check the power cord to make sure it’s still in working order. Finally, you should test the pump by dumping a bucket of water into it and seeing if it activates automatically and efficiently pumps out the water.